How to Build a Bug Tracking Template in Jira
A bug tracking template is a pre-defined format for documenting and reporting bugs in software development. Having a template ensures that crucial details are captured consistently, allowing for easier bug tracking, prioritizing, and communication within a team.
Jira is an issue tracker tool from Atlassian, and it’s probably one of the most popular bug tracking tools used for development project management (especially in agile environments). I have used it for many projects in the past years, with both Scrum and Kanban, and I find it very versatile.
In this article, I'll review Jira's versatility in bug tracking, customization and workflow management, and enhancing Bug Reporting with Jira.
Whether you are in charge of setting up the Jira workflows or you report defects using it, it doesn’t hurt to know how it works. Jira is more than just a bug reporting tool, but in this article, we will focus more on tracking bugs than managing other types of issues.

Need expert help selecting the right tool?
With one-on-one help, we guide you to your top software options. Narrow down your software search & make a confident choice.
Setting Up a New Project With Jira Software
If your project is new, the first thing you need to do is set up the Jira project. This job is usually for the scrum master or the project manager, but if your QA role overlaps with one of these roles, this task might fall on your shoulders. It’s not complicated, and anyway, it should be a one-time thing!
The sign-up is free, and for small projects with less than ten users, you can use the free plan. If you have a larger team or need advanced features, opt for one of the paid plans. I won’t get into the details, but you can check the Jira pricing page if you are interested.
I’ve only created new projects to teach a class, but the process is quite intuitive. You’ll have the option to choose between different types of projects for software development:
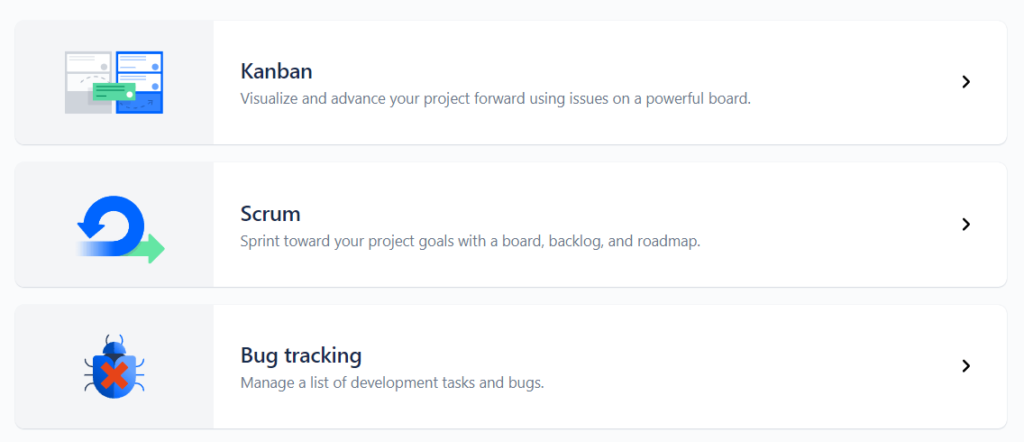
Project Types
- A Kanban project allows you to create Kanban boards. You can use the classic template with the classic stages: To do, In Progress, and Done.
- Scrum - This template allows the team to manage their sprints and backlog using the Scrum framework.
- Bug tracking – A simple template that allows issue tracking without using any agile methodology.
All projects can be customized to include the stages, transitions, and statuses the project needs.
For this tutorial, I’ll use the Scrum project template so you can track stories and bugs in the same project, but don’t worry – everything I show can be applied to other project types, too!
Issue Types
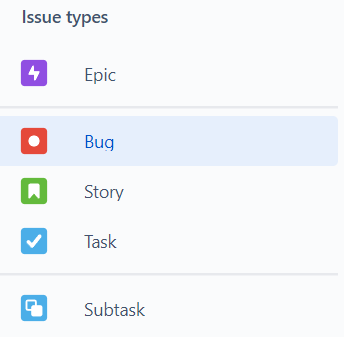
The default issue types provided by Jira are:
- Epic: In agile, an epic is a high-level collection of user stories and tasks.
- Bug: The type of issue we use in Jira to track found bugs and defects. We’ll focus on these in the rest of the article.
- Story: An agile user story (the description of the feature or functionality to be developed and tested).
- Task: Usually used to track single issues or to-do items, for example, researching a new test automation tool or updating the documentation.
- Subtask: This is an individual task assigned to a team member and is a child issue to the “Task” issue mentioned above.
As I already mentioned, Jira is very versatile, and if you need to create your own issue type, you can do this at any time in the project.
For instance, I used to work on a project where we had a separate issue type for improvements. These were similar to user stories but were related mostly to enhancements for existing features in the application.
Or you can create an issue type for test cases, but we’ll get to that a bit later, where we cover available plugins and Jira integration tools.
Bug Tracking With Jira
Moving on to what interests us as testers—bug reporting and tracking. While Jira is a project management tool, not specifically a bug tracking tool, we QAs will probably use it to do a lot of bug reporting 😁.
Workflow And Bug Life Cycle
The default bug workflow (and all issues, as a matter of fact) provided by Jira looks like this:
When an issue is opened, it is created with the 'To-do' status. Then, the issue, or bug, can be moved to any of the other statuses.
The test management team, the scrum master, or the project manager are usually in charge of designing any custom workflows.
The workflow reflects the bug life cycle you want to have in the project. You can keep the default, simple one, or have it as complex as needed. I’ve honestly never worked on a project that didn’t have its own, customized statuses and transitions.
To personalize the life cycle, you must go to the project settings, select the bug issue type, and click on 'Edit workflow.'
Here, you can add any new status and choose a specific transition if necessary. Here’s an example:
In this case, when a new issue is created, it will have the 'To do' status, from where it can only be moved to 'In progress.' Then, before the bug can be tested, the code needs to be reviewed. The QA team can close it once it is validated in the 'In QA' status. Of course, the code review and the QA processes may fail, and if so, the bug will be moved back to 'In progress.'
Step By Step Workflow Creation
I’ll go through each step you need to do to go from the first workflow to the second one (or any custom workflow you find fitting for your project):
1. First, click on the 'Edit workflow' button
2. To add a new status, click on one of the statuses—the statuses are separated into three categories: 'To do,' 'In progress,' and 'Done,' each assigned a specific color. You can choose where your status best fits. I decided that 'In code review' and 'In QA' statuses mean that the issue is still in progress:
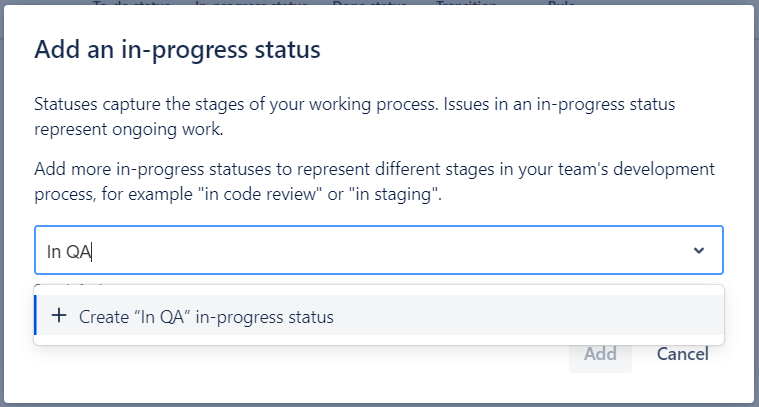
You can also have other 'To do' statuses; for example, an 'In review' status, for when a new feature is opened and the product owner or business analyst still needs to add information about it, or the team has yet to refine it and decide on its complexity or estimate its story points.
3. Once you’ve added the new status, you can add a transition for it. The default will be that the status can be updated from any other status. If you don’t want specific transition rules, that’s fine. However, a good workflow would allow bugs and issues to be moved to specific statuses only after they have been through certain process steps.
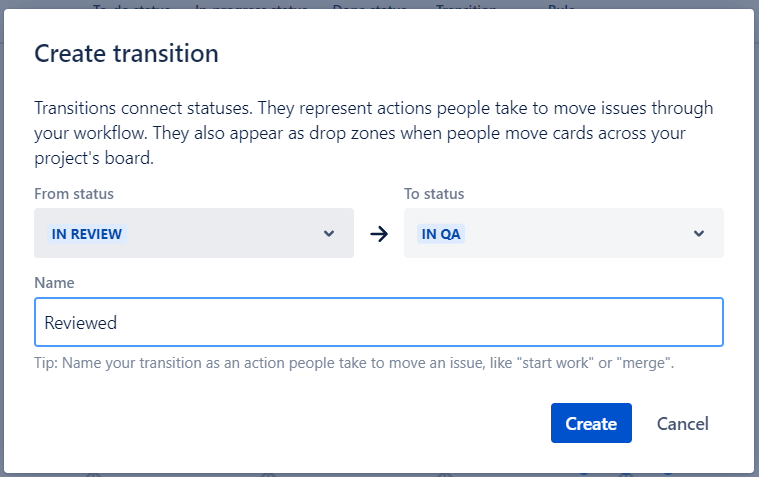
In my example above, the QA team cannot start working on verifying the fix before another developer reviews the code. To add this transition, click on the 'Transition' button and enter the details:
4. You can also delete any existing transitions and statuses if you want everything to be 100% customized.
5. A really cool feature is the automatic assignees. This is also done from the workflow, where you can set a default assigned user when a certain transition is performed on the issue.
For example, after a bug is 'Reviewed' and moved to 'In QA,' it’s automatically assigned to a certain tester or the test manager who will decide who works on it. The same goes for 'In Progress' and the development team. Newly created issues can be automatically assigned to a project manager or product owner, who will prioritize them in the backlog. It is highly customizable so that you can personalize it however works for your team.
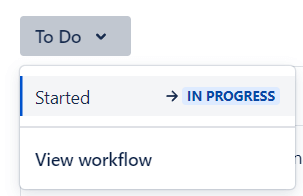
Even if you are not in charge of setting up the issues life cycles, or if you don’t have access to the project settings, you can see the workflow for each Jira issue by expanding the status dropdown:
Viewing Issues in Jira
If the project is not a bug tracking project, you can view the current issues in the Kanban or the Scrum boards:

This is only to demonstrate; I doubt you’ll ever be lucky enough to have a sprint with just one user story and one bug 😅.
Clicking on any issue will display its details. These contain, but are not limited to, an ID, which is automatically created by Jira, a title, a description, the reporter, the assignee, and any attachments or comments that the team members added.
The fields can also be customized, and I’ll demonstrate that when we discuss what we should include in a good bug report.
Assignees
All Jira issues can be assigned to a specific team member. You can tag people in the comments or the description using the @ character before the user’s name.
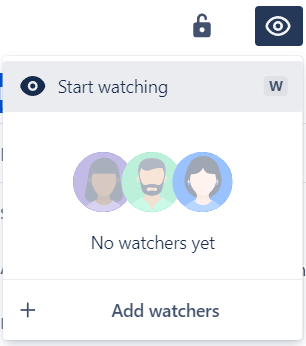
You’ll receive notifications when someone tags you and when an issue assigned to you or reported by you is updated. You can also “watch” issues. You’ll be notified when watched issues are updated regardless of the reporter or the assignee.
Bug Reporting in Jira
An app with few bugs is what everyone strives for, but let’s be honest: testers are always happy when we find a good bug.
But a good bug is only as good as how we report it—a good bug report will make sure that it will get fixed with as little back-and-forth between the testing and development teams as possible. Jira is a great bug tracker tool. Did I already mention it? It allows a lot of flexibility.
To create a new issue, click the big 'Create' button, and a dialog will open. Here, select the 'Bug' issue type:
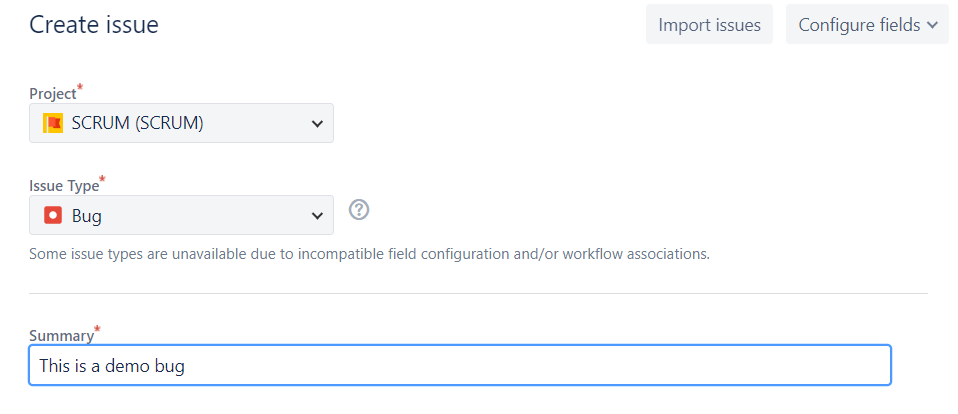
A good bug report should include a good description (or 'Summary' in Jira). It should be concise but provide enough details so it’s clear what the issue is about.
Then, in the description, add all the relevant details. You can structure them in a classic manner:
- Steps to reproduce
- Expected result
- Actual result
Then, include any other details that are relevant to the defect. Screenshots or recordings are always a good idea, as well as logs or specific files used during the execution.
Jira allows adding custom fields to issues. I like to separate the 'Severity' from the 'Priority.' So, while 'Priority' is a default field added by Jira, you can add a custom one for 'Severity.'
Other custom fields worth adding can be related to the operating system—a text field or a drop-down with predefined values, such as the Android and iOS versions used in testing, the browser, the build number, or any other information that can be relevant when tracking bugs.
To add new fields, you can go to the project settings, select the 'Bug' type, and choose which type of field you need:

Test Cases in Jira
The last thing I want to talk about is test cases. Jira software can be integrated with various test management tools, or you can add Atlassian extensions and add-ons, such as Zephyr (which used to be my favorite) or Xray. When you create a bug as a result of a failed test case, the test can be linked to the bug, which can be very helpful in managing bugs, tests, and test case execution.
Want More?
Jira can be a great defect tracking tool and can improve the development process because it allows a lot of customization. When it comes to bugs, it’s really useful because you can customize the workflow to fit the life cycle you want to have in your project. You can link bugs to test cases and add custom fields in the way that makes the most sense to your specific project.
For more how-to guides like this, subscribe to The QA Lead newsletter.
Need expert help selecting the right Testing Software?
If you’re struggling to choose the right software, let us help you. Just share your needs in the form below and you’ll get free access to our dedicated software advisors who match and connect you with the best vendors for your needs.