How To Use Postman To Test APIs

Postman is one of the most popular tools for developing and testing APIs. I've been using it since 2017, and learning how to use Postman to test APIs really helped me speed up my testing process.
In this article, I will walk you through, step by step, showing how to validate API requests using Postman. By the end, you should be able to create your own automated tests.
But before we dive into the actual Postman tutorial, let me explain some things about APIs.

Need expert help selecting the right tool?
With one-on-one help, we guide you to your top software options. Narrow down your software search & make a confident choice.
What Are APIs?

API is short for Application Programming Interface. Still not very clear, right? 😅 Let me expand on that:
API is an interface that defines the ways that scripts or programs can communicate with an application or service. They work by sharing data and information between applications, systems, and devices.
The most common API at the time is REST API, which I will be using further in this Postman API testing tutorial. REST is also an acronym for REpresentational State Transfer. REST APIs rely on principles such as client-server communication, uniform interfaces to communicate between systems, stateless operations, and more.
Communication is done through HTTP requests and responses.
The anatomy of HTTP requests
HTTP requests have 4 main components:
- The URL
- The endpoint, which represents the specific resource we want to interact with.
- The HTTP method—HTTP methods tell the server whether we are trying to retrieve information or what kinds of modifications we would like the application to do. We will cover the basic CRUD operations today:
- Create: POST
- Read: GET
- Update: PUT
- Delete: DELETE
- The request body. This is optional, depending on the method we use. We’ll use the JSON (JavaScript Object Notation) format in this Postman tutorial.

HTTP response codes
When we make an HTTP request, the server issues a response code, which tells us if the request was successful or not. The main HTTP response code categories are:
- 1xx: informational response
- 2xx: success
- 3xx: redirect
- 4xx client error
- 5xx server error
I really love this visual representation from Julia Evans:

You can find a complete list of the response codes here, or if you prefer them explained by cats, here 🐱👓
OK, so I think we covered enough ground to get started on the actual tutorial—now let’s see how to use Postman to test APIs!
How To Use Postman To Test APIs (Step By Step)
You can use Postman in two ways: directly from the browser (you will need to create an account to be able to do this), or installed, on your local machine—having an account is optional for this option.
I prefer to have it installed, simply because I don’t like the clutter of too many opened browser tabs, so this is what I will use going forward.
This is a beginner tutorial, so I will use some simple test cases to demonstrate how to use Postman to test an API. The demo app I will use is Swagger Petstore, and the scenario I will test is:
- Add a new pet to the store using ‘pending’ status
- Update the status of the pet to ‘available’
- Validate that the pet information was updated
- Delete the pet
- Confirm the pet was deleted
Ok, let’s go!

The first HTTP request in Postman
Postman allows grouping the API requests into collections. These are groups of related HTTP requests. Go ahead and create a new collection for all the following requests you’ll use in the tests:

OK, so now you have an empty collection.
Click the 'Add a request' URL or the '+' button in the list of the tabs:

The Swagger UI page serves as documentation for the API.
The resource (endpoint) you need for creating a new pet is '/pet' and the HTTP method is POST.
From the model tab, you can see the object you have to send as the request body, and the data types for each value:

We’ll use the JSON format to send the response body, so enable the 'raw' radio button and select JSON from the dropdown.
The request body should look something like this:
{
"id": 0,
"category": {
"id": 0,
"name": "dog"
},
"name": "Spike",
"photoUrls": [
"string"
],
"tags": [
{
"id": 0,
"name": "bulldog"
}
],
"status": "pending"
}
You can easily add the rest of the details in the new request tab:

To create this new pet on the server, click the Send button.
If all goes well, you will receive a success response, and the response body will contain some information about the pet, including its ID.
We will need to use this moving forward:

The next step is to update the pet information.
For this, you need to access the same resource, '/pet', but send a request with the HTTP method PUT.
You can see what information you need to send in the request body:

So, create a new request, using the same request URL, select the PUT method, and send the same request body, except change the status value to ‘available’, and use the ID from the previous response:
{
"id": <enter the ID here>,
"category": {
"id": 0,
"name": "dog"
},
"name": "Spike",
"photoUrls": [
"string"
],
"tags": [
{
"id": 0,
"name": "bulldog"
}
],
"status": "available"
}
The response should once again be 200 OK. Next, let’s read the information of the pet, to validate that the status has been correctly updated.
The HTTP method for this is GET, and the request accepts the ID as a parameter:

The response contains all the pet’s data, including the status, which now has the ‘available value’:

The deletion request will be done to the exact URL as the GET (including the ID parameter), but the selected HTTP method will be DELETE:

Once again, the request should be successful and the HTTP response 200:

If you resend the GET request for the same pet ID, you will get a nice 404 HTTP requests, because the pet cannot be found on the server anymore:

Adding tests in Postman
With the previous steps, you went through all the steps in the test scenario, but every result had to be validated manually, by checking the response codes and bodies.
Let’s see how to automate the API tests using Postman, so you don’t have to perform these checks manually.
Begin with the first request, the POST, and click the Tests tab of the request.
Choose from the right-hand side the snippet 'Status code: Code is 200'. Snippets in Postman are pre-defined scripts you can use so you don’t have to manually write the code yourself. Every line of code that we enter in the Tests tab of the request will be executed after the request was sent.
You can change the name of the test to something more descriptive (e.g. 'Pet creation was successful').
Resend the request and this time you will see that the Test Results tab of the response shows 1/1 of tests passed, and the name of the passed test:

You can add this snippet to the PUT and DELETE requests as well.
To validate the status value in the response of the GET request, use the snippet ‘Response body: JSON value check’:
pm.test("Your test name", function () {
var jsonData = pm.response.json();
pm.expect(jsonData.value).to.eql(100);
});
What this code snippet does is save the response in a variable code jsonData, which it will parse, read the value of an attribute, and compare it to an expected value.
For us, this means the ‘status’ attribute should have the ‘available’ value. The test should therefore look like this:
pm.test("The pet status is 'available'", function () {
var jsonData = pm.response.json();
pm.expect(jsonData.status).to.eql("available");
});
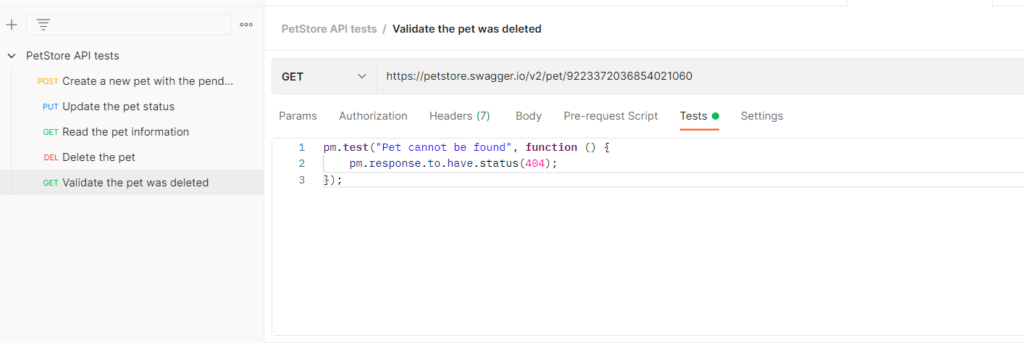
And for the final check, which confirms that the pet was deleted, by running the GET again, we can duplicate the initial GET request and add a test that validates the HTTP response code this time is 404:

You can move the requests inside the collection by dragging and dropping them.
Using variables in Postman
You probably noticed that we had to manually copy and paste the ID from the POST request to all the following requests. What if there was an easier way to do this?
The good news is, there is! We can use Postman variables to store reusable values, so if the values need to change, we can change them in a single place, the same way we aim to do in all automated tests.
Postman variables have 3 scopes:
- Global: variables that will be accessed from any environment and any collection
- Environment: variables saved at the environment level. I did not use environments for this tutorial, but it’s good to know that Postman allows us to create different environments for the various environments we work with. For example, separate environments for Dev, UAT, and Production
- Collection: these variables are stored at the collection level, and they can be accessed from all the requests within the collection.
There are multiple ways to set up collection variables.
The simplest way is to simply create it from the collection.
To do this, click on the collection name, select the variables tab, and enter the variable name and value:

To use this variable, replace the original value in the requests with the variable name written between two accolades, like this: {{petId}}
You will need to use it inside the POST and PUT request bodies, for the “id” parameter, like this:
"id": {{petId}},
And in the URL of the GET and DELETE requests, like this: https://petstore.swagger.io/v2/pet/{{petId}}
You can see the final version of the collection here.
Running the Postman collection
And now comes the best part! The whole point of this tutorial was to show you how to run automated tests using Postman. Everything we did before was to prepare for this part.
To run the tests automatically, right-click on the collection name, or hover it, then click on the meatballs menu next to the name, and select ‘Run collection’.

This will open up the Collection Runner:

In this screen, you can select which of your requests you want to send, you can change their order, you can run the collection multiple times (by increasing the Iterations number), or you can add delays between the requests.
You can just leave the default values for now and click the ‘Run’ button. After the run completes, you will be able to see the test results for all the scenarios we wanted to test, with just a simple click:

And that was it! If you followed along with all the steps in this article, you should have your first API Postman automated tests! 🚀
Wrap Up
Postman is a very helpful tool when it comes to testing APIs, and this article only scratched the surface. However, we did manage to cover how to send HTTP requests, how to read the responses, how to create tests, and how to automatically check the test results.
If you liked this article, subscribe to the QA Lead newsletter so you are up to date with all the news and trends in software testing.
Need expert help selecting the right Testing Software?
If you’re struggling to choose the right software, let us help you. Just share your needs in the form below and you’ll get free access to our dedicated software advisors who match and connect you with the best vendors for your needs.